Streamlabs Invalid Request! Feel Free to Try Again With a Valid Token
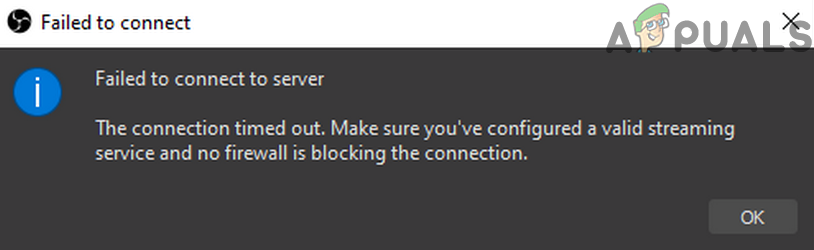
OBS may fail to connect to the server if its installation is outdated. Moreover, the wrong configuration of the Bind IP or MTU may also cause the issue at manus. The user encounters the consequence when he tries to stream (regardless of the streaming service) through the OBS application but encounters the post-obit type of message:
Failed to connect to server. The connection time out. Make sure you've configured a valid streaming service and no firewall is blocking the connection.
Before moving on to the solutions to gear up OBS failed to connect to the server, bank check if you tin stream in OBS on a different network or a different device on the same network. Also, cheque if the streaming service servers are upwardly and running. Moreover, make certain to enable Wi-Fi (even if you are using an Ethernet cable). Additionally, bank check if the Ethernet cablevision is plugged into a regular Ethernet port, not a 10GE port. Furthermore, bank check if rebooting your PC and networking equipment solves the problem. Last simply not to the lowest degree, if you are hosting a Vodcast, then make sure to end it and then try to stream using OBS.
Solution 1: Create and Re-enter the Stream Key
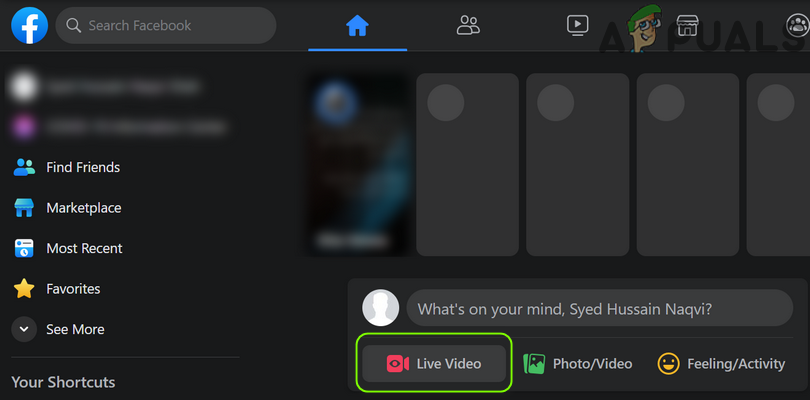
A temporary glitch between the OBS application and streaming service may cause the server issue and may get cleared subsequently re-entering the Streaming key after resetting key. For illustration, we volition discuss the process for Facebook Alive, you may follow the instructions as per your streaming service.
- Launch the Facebook in a spider web browser and click on the Live Video (in the new mail section).
Open Live Video on Facebook - Then select Use Stream Key and scroll down till the end.
- Now click on Reset (in front of the Stream Fundamental) and then re-create the Stream fundamental.
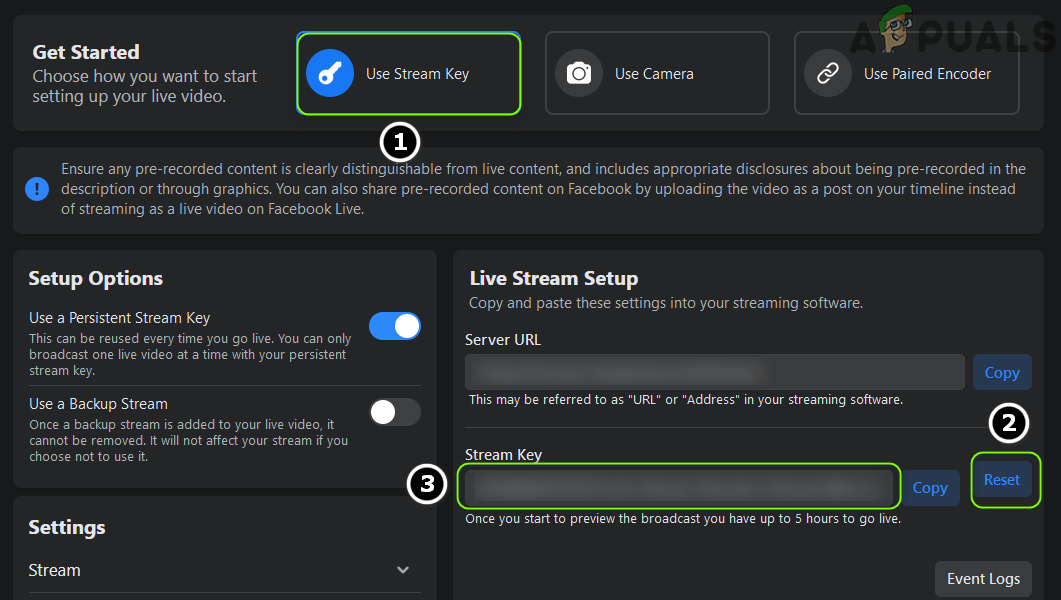
Create a New Stream Key in Facebook - Then launch OBS and click on Settings (near the bottom of the screen).
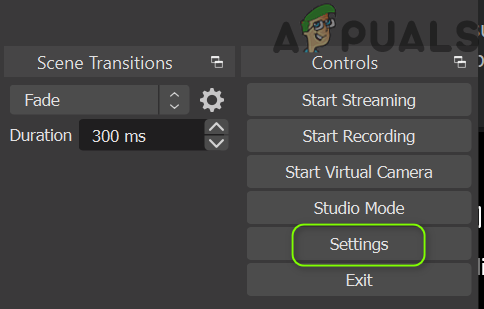
Open the OBS Settings - Now select Stream and paste the copied key in the Stream Key box.
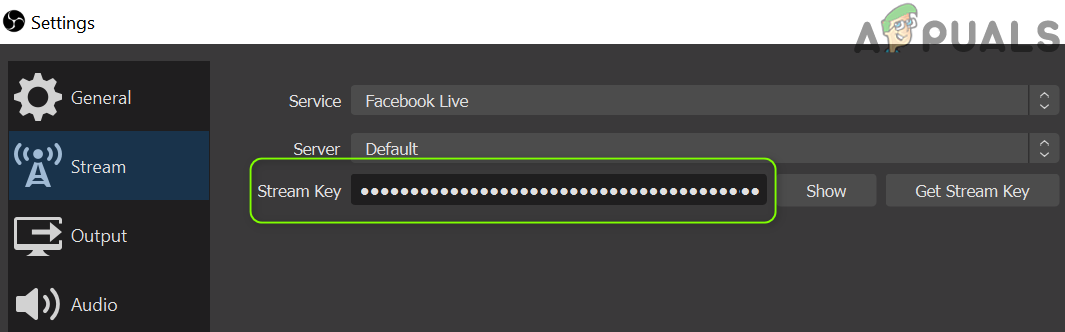
Paste the Stream Key in the OBS Settings - So apply your changes and check if the OBS is streaming without whatever issue.
If the issue persists, check if using a different business relationship (e.g., a different Twitch business relationship, if the issue is occurring with Twitch) resolves the OBS effect.
Solution 2: Enable Dynamic Bitrate in OBS
You may encounter the effect at mitt if the frames are dropping during the streaming process. In this case, enabling the Dynamic Bitrate may solve the problem (this choice is only available on OBS version 24 and above).
- Launch OBS and open up its Settings.
- Now, in the left pane, select Advanced, and in the right pane, scroll down till the cease.
- Then, in the Network department, checkmark the option of Dynamically Change Bitrate to Manage Congestion (just nether Bind to IP).
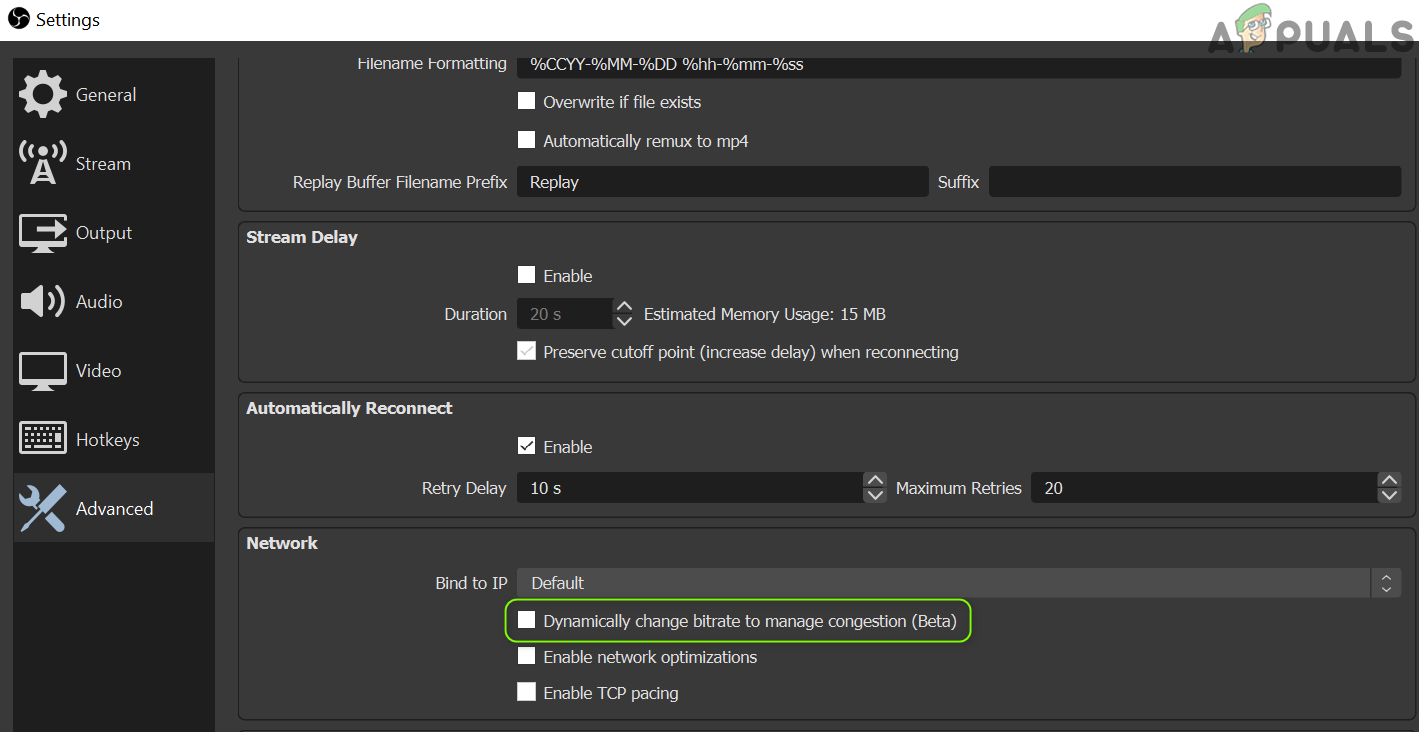
Enable Dynamically Change Bitrate to Manage Congestion - Now utilize your changes and relaunch OBS to bank check if it is working fine.
Solution 3: Update the OBS and Bone of Your Arrangement to the Latest Build
The OBS awarding may show the failed to connect to server bulletin if the OBS application or the OS of your system is outdated equally it can create incompatibility between the both (besides as with the servers you lot desire to stream). In this scenario, updating the OBS and OS of your system to the latest build may solve the problem.
Update the OBS Application
- Launch the OBS awarding and open its Assist carte du jour.
- At present select Check for Updates and if an update is available, utilise the update.
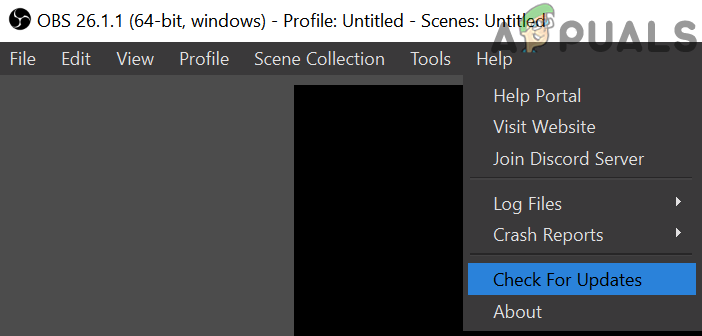
Check for Updates of OBS - Then reboot your PC and bank check if the OBS is working fine.
If y'all are using an obsolete version, then download/install (without uninstalling the previous version) the latest version of the OBS application and check if that resolves the OBS result. If you are using a Linux distro that is based on PPA (like Ubuntu), then yous may execute the post-obit in the Shell to bank check if that resolves the OBS issue:
sudo apt install ffmpeg sudo add together-apt-repository ppa:obsproject/obs-studio sudo apt update sudo apt install obs-studio
Update the Os of your Organization
For analogy, nosotros will discuss the process for a Mac organisation, you lot may follow the instructions equally per the Bone of your organisation to update.
- Launch the Apple Preferences and open up Software Update.
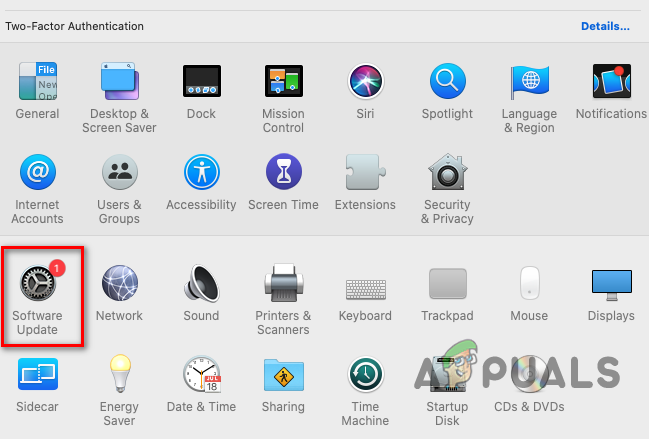
Open Software Update in the Mac's Preferences - At present, cheque if an update of the Bone is available, if so, utilize the update and reboot the device to check if the OBS application is articulate of the failed to connect to server issue.
Solution 4: Change the Streaming Server
The OBS application may fail to connect to a server if the server itself is downwards. In this instance, changing the streaming server to a different location may solve the problem. For analogy, we will discuss the process for the Twitch service. Simply earlier proceeding, it will be a expert idea to apply a port scanner to check if the server port is open. If so, make sure an application is listening to the open port.
- Launch the OBS awarding and click on Settings.
- At present steer to the Stream tab and expand the dropdown of the Server (for some distant servers, you may accept to lower the bitrate).
- So select a dissimilar server and apply your changes.
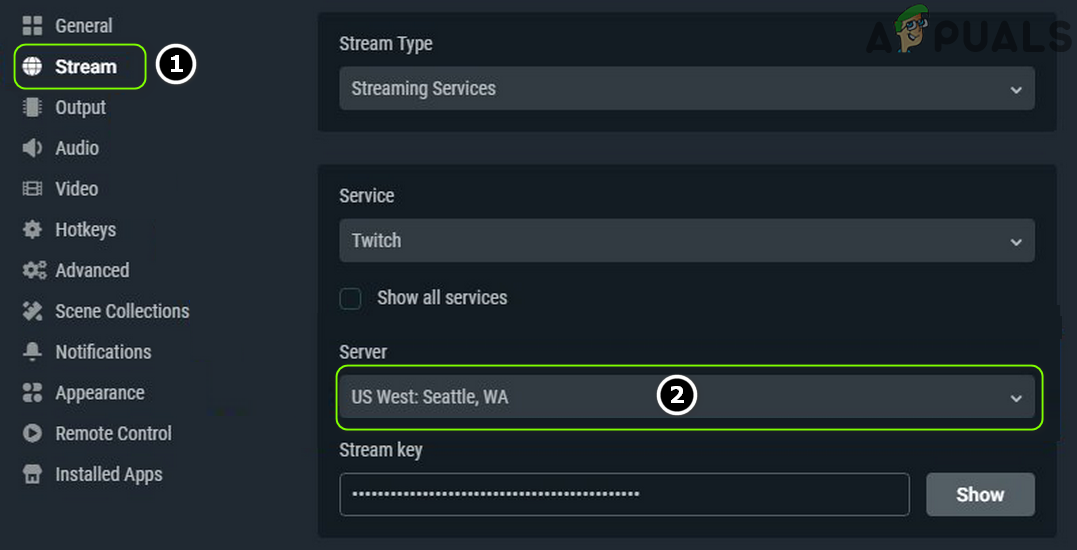
Modify Streaming Server in OBS - Now relaunch the application and check if the OBS is clear of the server issue. If the result persists, then y'all may try all the servers one by 1 in the OBS to sort out the issue.
If yous are having problem finding the server, then you may apply the Twitch Exam utility (or Ping the server) to find out the best server for y'all. For some services, you can effort besides try the auto-configure option to solve the OBS issue.
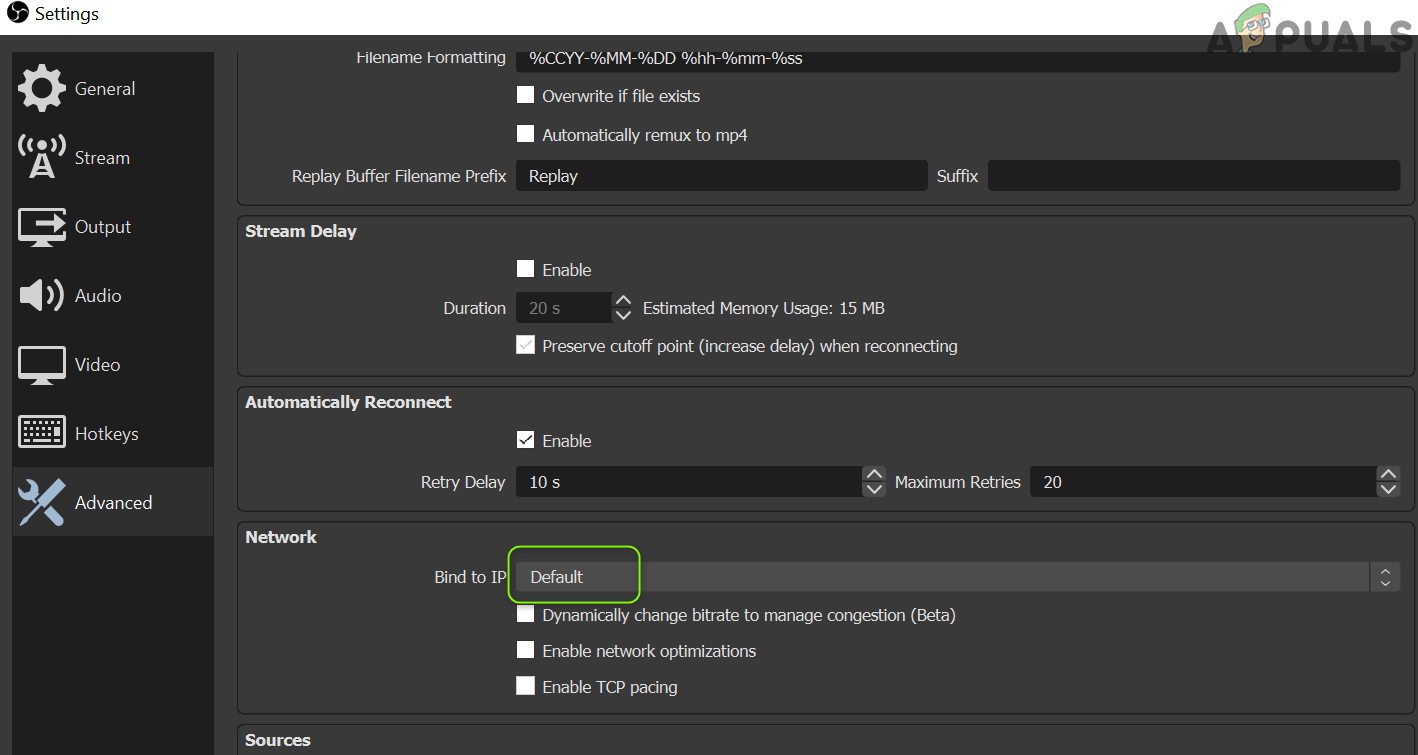
Solution 5: Edit the Bind IP Option in the Advanced Network Settings
The OBS application may fail to connect to a server if the Demark IP option in the Avant-garde Network settings is not properly configured. In this context, properly configuring Bind IP may solve the problem.
- Launch the OBS application and open its Settings.
- Now, in the left pane, steer to the Advanced tab, and in the right pane, scroll till the end of the screen.
- And so, in the Network section, expand the dropdown of the Bind to IP and select Default.
Ready Bind to IP to Default in OBS - If it is already set to Default, then select the network connection name with the IP address (preferably IPv4 accost) of your system. If the Demark to IP option is greyed out, make certain to disable all OBS outputs like NDI, virtual photographic camera, etc., and endeavour again).
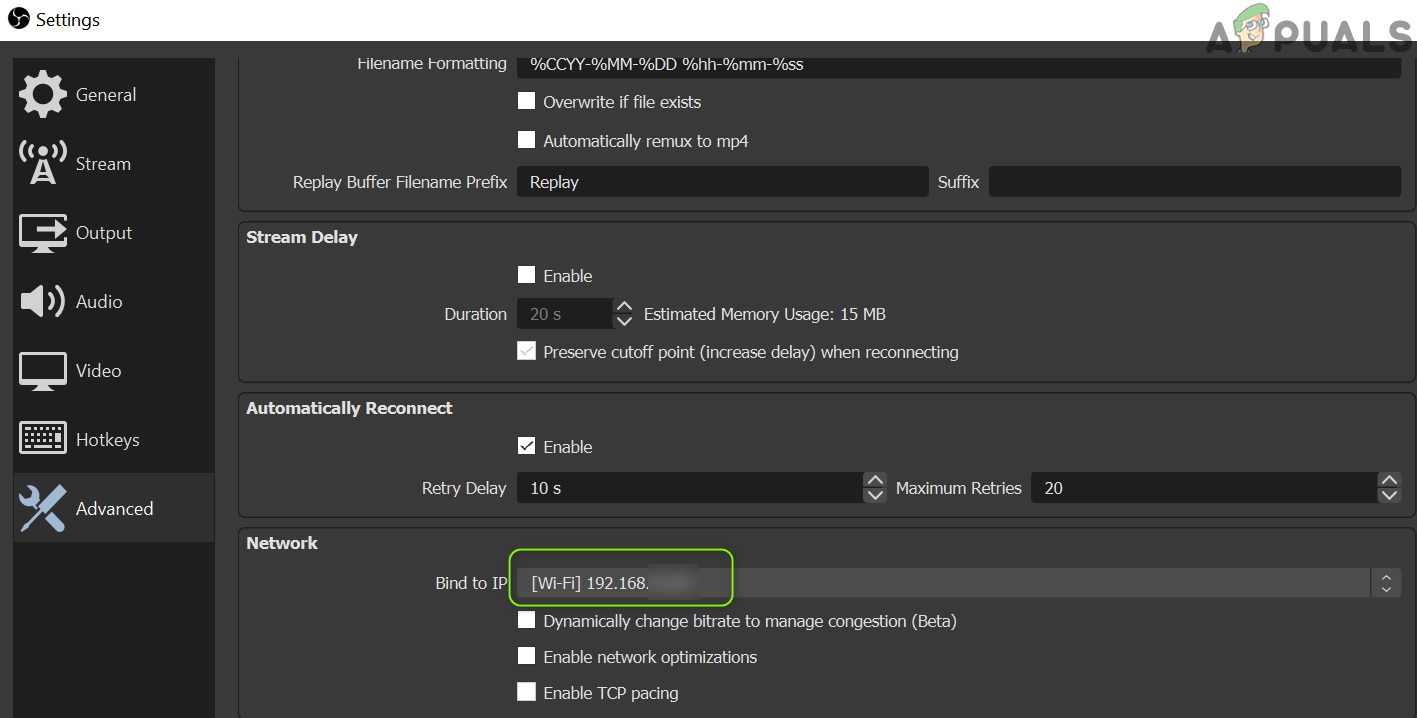
Set Demark to IP to Your IPv4 in OBS - Now apply your changes and bank check if the OBS can connect to the server.
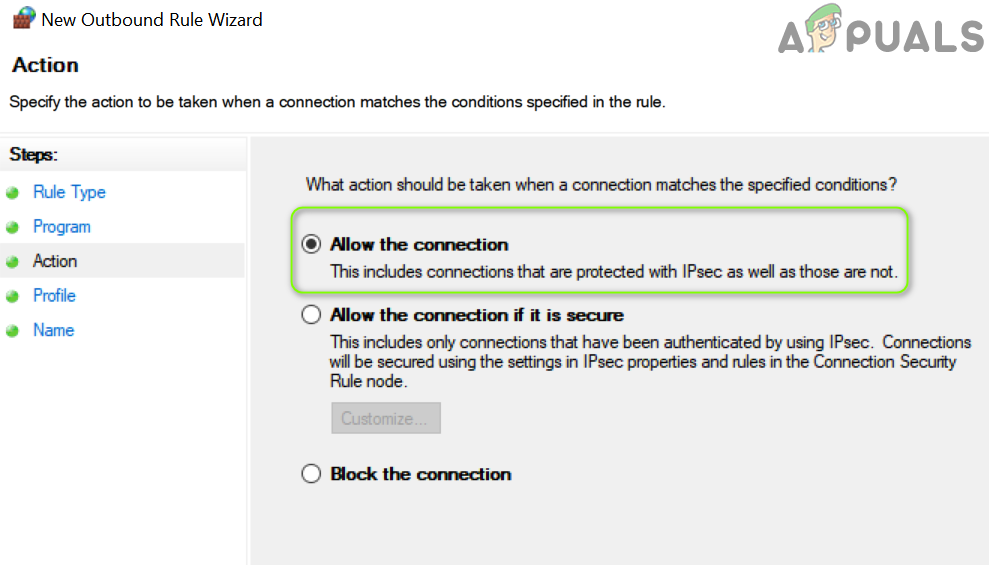
Solution 6: Permit the OBS Through the Firewall of Your System
Y'all may neglect to stream through the OBS if your system'due south Firewall is blocking access to a resource vital for the functioning of the OBS awarding. In this context, allowing the OBS through the Firewall settings of your arrangement may solve the problem. For elucidation, we will talk over the process for Windows Defender Firewall.
- Click Windows, blazon: Firewall, and open up Windows Defender Firewall with Advanced Security.
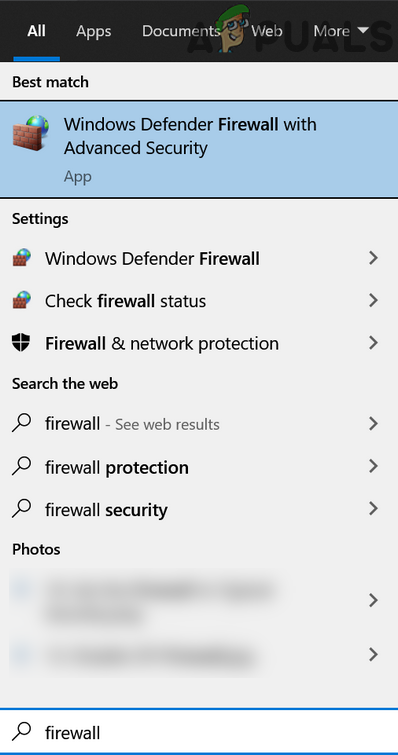
Open Windows Defender Firewall - Now, in the Outbound Rules and Inbound Rules tab, brand sure no dominion is blocking OBS (e.g., select Entering Rules and press the O key to check for OBS entry).
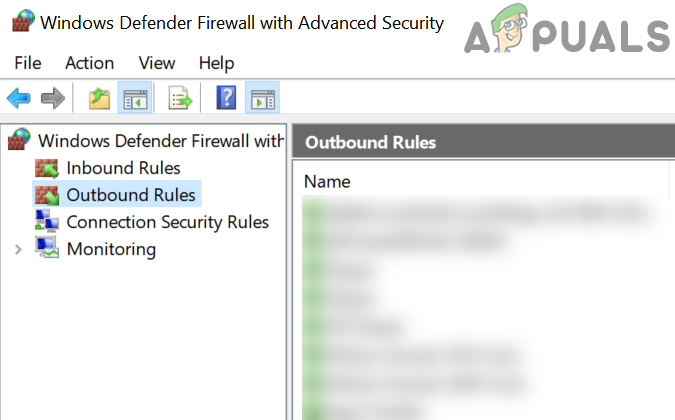
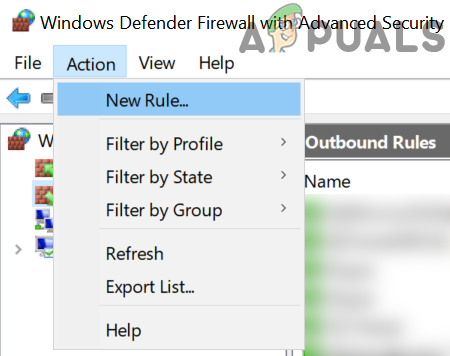
Cheque Firewall for Rules Blocking OBS and Select Outbound Rules - And then, in the left pane, select Outbound Rules and expand the Activity menu.
Create a New Rule in Firewall - Now open New Rule and select the radio push of Program.
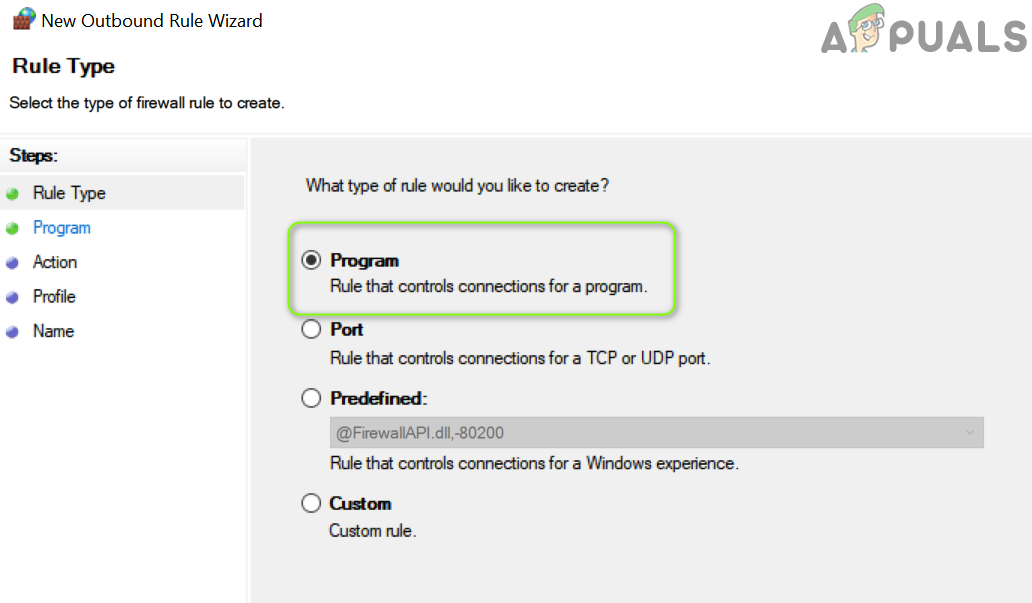
Select Program in New Rule Window - Then click on Next and click on Browse (in front of This Programme Path).

Open Browse and Steer to The Installation Directory of OBS - At present navigate to the installation directory of OBS and select its EXE file equally per your OS version (e.g., OBS64.exe in the /bin/64bit folder of the installation directory).
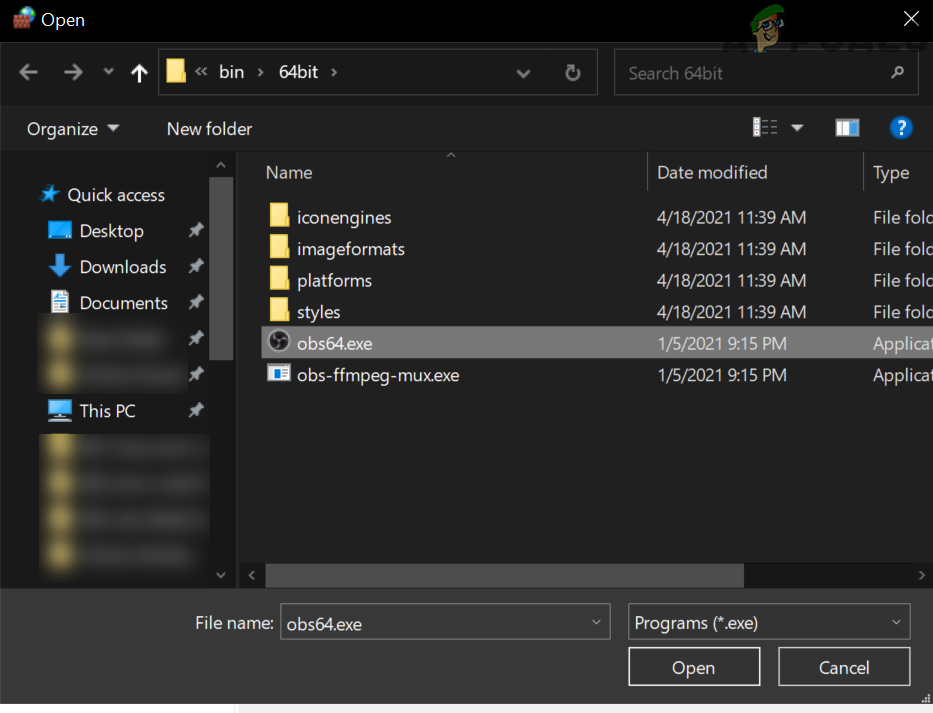
Select OBS64.exe in Firewall Rule - Once the path is added in the Firewall window, click on Next and select the radio button of Let the Connexion.
Select Allow The Connection in New Rule Window - Then select the Contour every bit per your requirements (for testing, information technology is better to select all the iii options i.east., Domain, Private, and Public) and click Next.
- Now enter the proper name and clarification equally per your requirements and click on Adjacent.
- And then reboot your PC and check if the OBS tin can stream without any issue.
If the event persists, so make sure that the router's firewall is non blocking OBS. Also, if you are using the OBS application in a VM, and then check if the Firewall (of the organisation or Router) or the VM itself is non blocking the access of the OBS. If so, then open the TCP port 1935 (Outbound Rules>> Activity>> New Rule>> Port>> TCP 1935) in the Firewall settings to check if that resolves the OBS issue. If the issue persists, then check if disabling the antivirus of your PC resolves the OBS connexion issue.
Solution 7: Lower the MTU (Maximum Transmission Unit) Size
The MTU (Maximum Transmission Unit) is used to set the maximum size of the network bundle to be sent and a streaming server may drop the packets (sent by the client) that are greater in the size from the configured MTU size of the server. In this scenario, lowering the MTU (Maximum Transmission Unit) size may solve the problem. For illustration, we will hash out the procedure for a Windows PC and y'all may follow the procedure as per your OS.
- Right-click Windows and select PowerShell (Admin).
- Now execute the following:
netsh int ipv4 show subinterface
- And then annotation downwards the name of your network in the Interface column and execute the following:
netsh interface ipv4 set subinterface <subinterface name> mtu=1400 store=persistent
- Then over again execute the following to check if the MTU size of your network adapter has inverse:
netsh int ipv4 testify subinterface
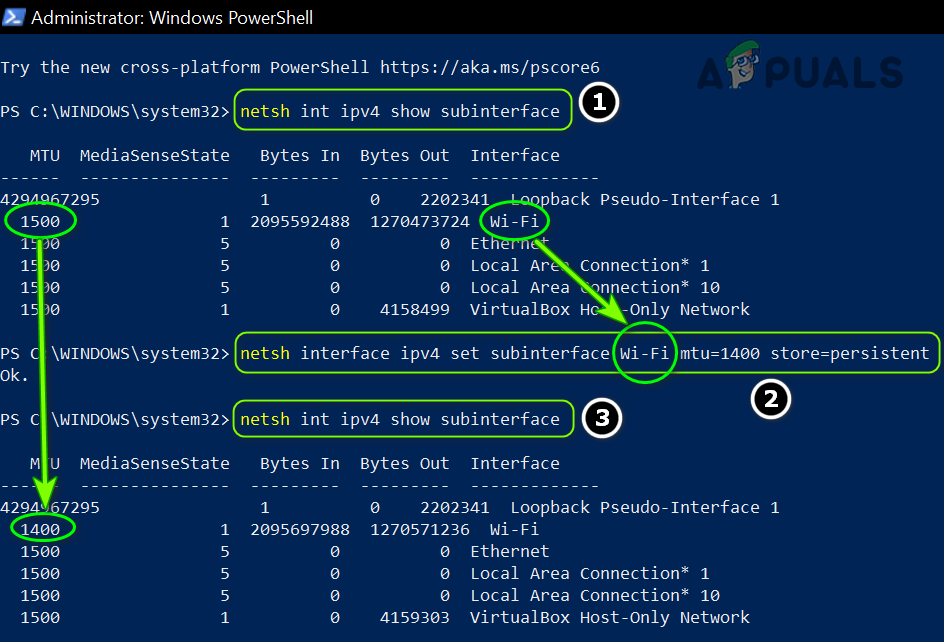
Change the MTU of Your Network Adapter - At present reboot your PC and check if the OBS is articulate of the failed to connect to server issue.
Solution viii: Reset the Router to the Manufactory Defaults
You may encounter the consequence at hand if your router settings are corrupt. In this instance, resetting the router to the manufactory defaults (brand sure to proceed the credentials/instructions available) may solve the problem. This process is commonly not difficult only due to diversity in the router's make and models, it is not viable to cover all of them but the general approach is commonly the same. You can reset the router either through a push button on the router or apply its web portal.
Reset Router Through a Button
- Switch on your router (if powered off) and locate the Reset push, either on the lesser or backside of the router.
- Now printing / hold (you may apply a modest and pointy item, east.g., a paperclip)the reset button for at to the lowest degree thirty seconds.
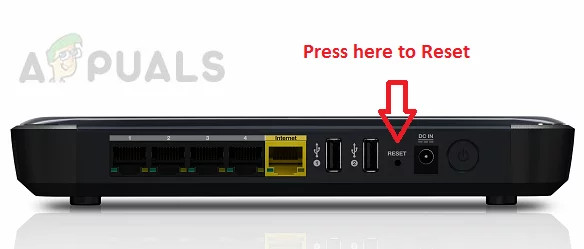
Reset Your Router - Then release the reset button and wait till the router is fully reset and powered on (it may have 30 to lx seconds to complete). If there is no Reset button on the router, check your device's transmission to find out if the ability button of the router tin can be used to reset it.
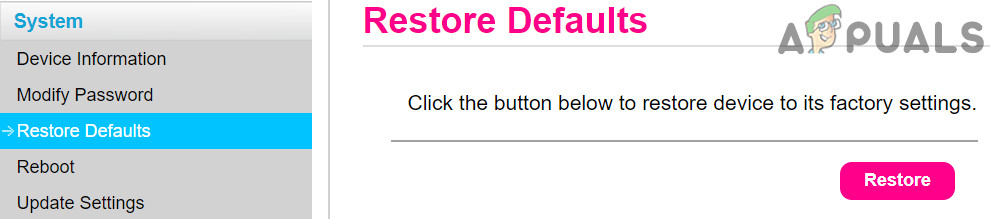
Reset Router Through the Web Portal
- Launch a web browser and steer to the default gateway of the router (e.g., 192.168.1.ane, the default gateway can be found by the IPConfig command in the Control Prompt). Then enter the credentials to open the router's web portal.
- Now, the complicated function, as the reset option may be located at different locations in unlike routers. Unremarkably, it is in the System or General tab. Locate the Reset Settings (or Restore Defaults) option then click on it. At present confirm to reset the router and wait till the process is completed.
Restore Your Router to Default Settings'
After resetting the router, make sure the necessary ports are forwarded (if required by the streaming server) and hopefully, OBS failed to connect issue is resolved.
![]()
dennistonbestione.blogspot.com
Source: https://appuals.com/solved-obs-failed-to-connect-to-server/
Belum ada Komentar untuk "Streamlabs Invalid Request! Feel Free to Try Again With a Valid Token"
Posting Komentar